This special week is all about honoring the incredible journey of creating a yearbook — not just the finished product, but the invaluable skills students develop along the way.
Established in 1987 by President Ronald Reagan, the first week of October was designated as National Yearbook Week to recognize the hard work and dedication involved in capturing the memories and stories of your school community.
Yearbook staffers have a unique role that goes beyond simple documentation. Use this week as a chance to unite your team, celebrate your accomplishments and showcase the amazing work you do to your school. Let’s make this a memorable week for everyone involved!
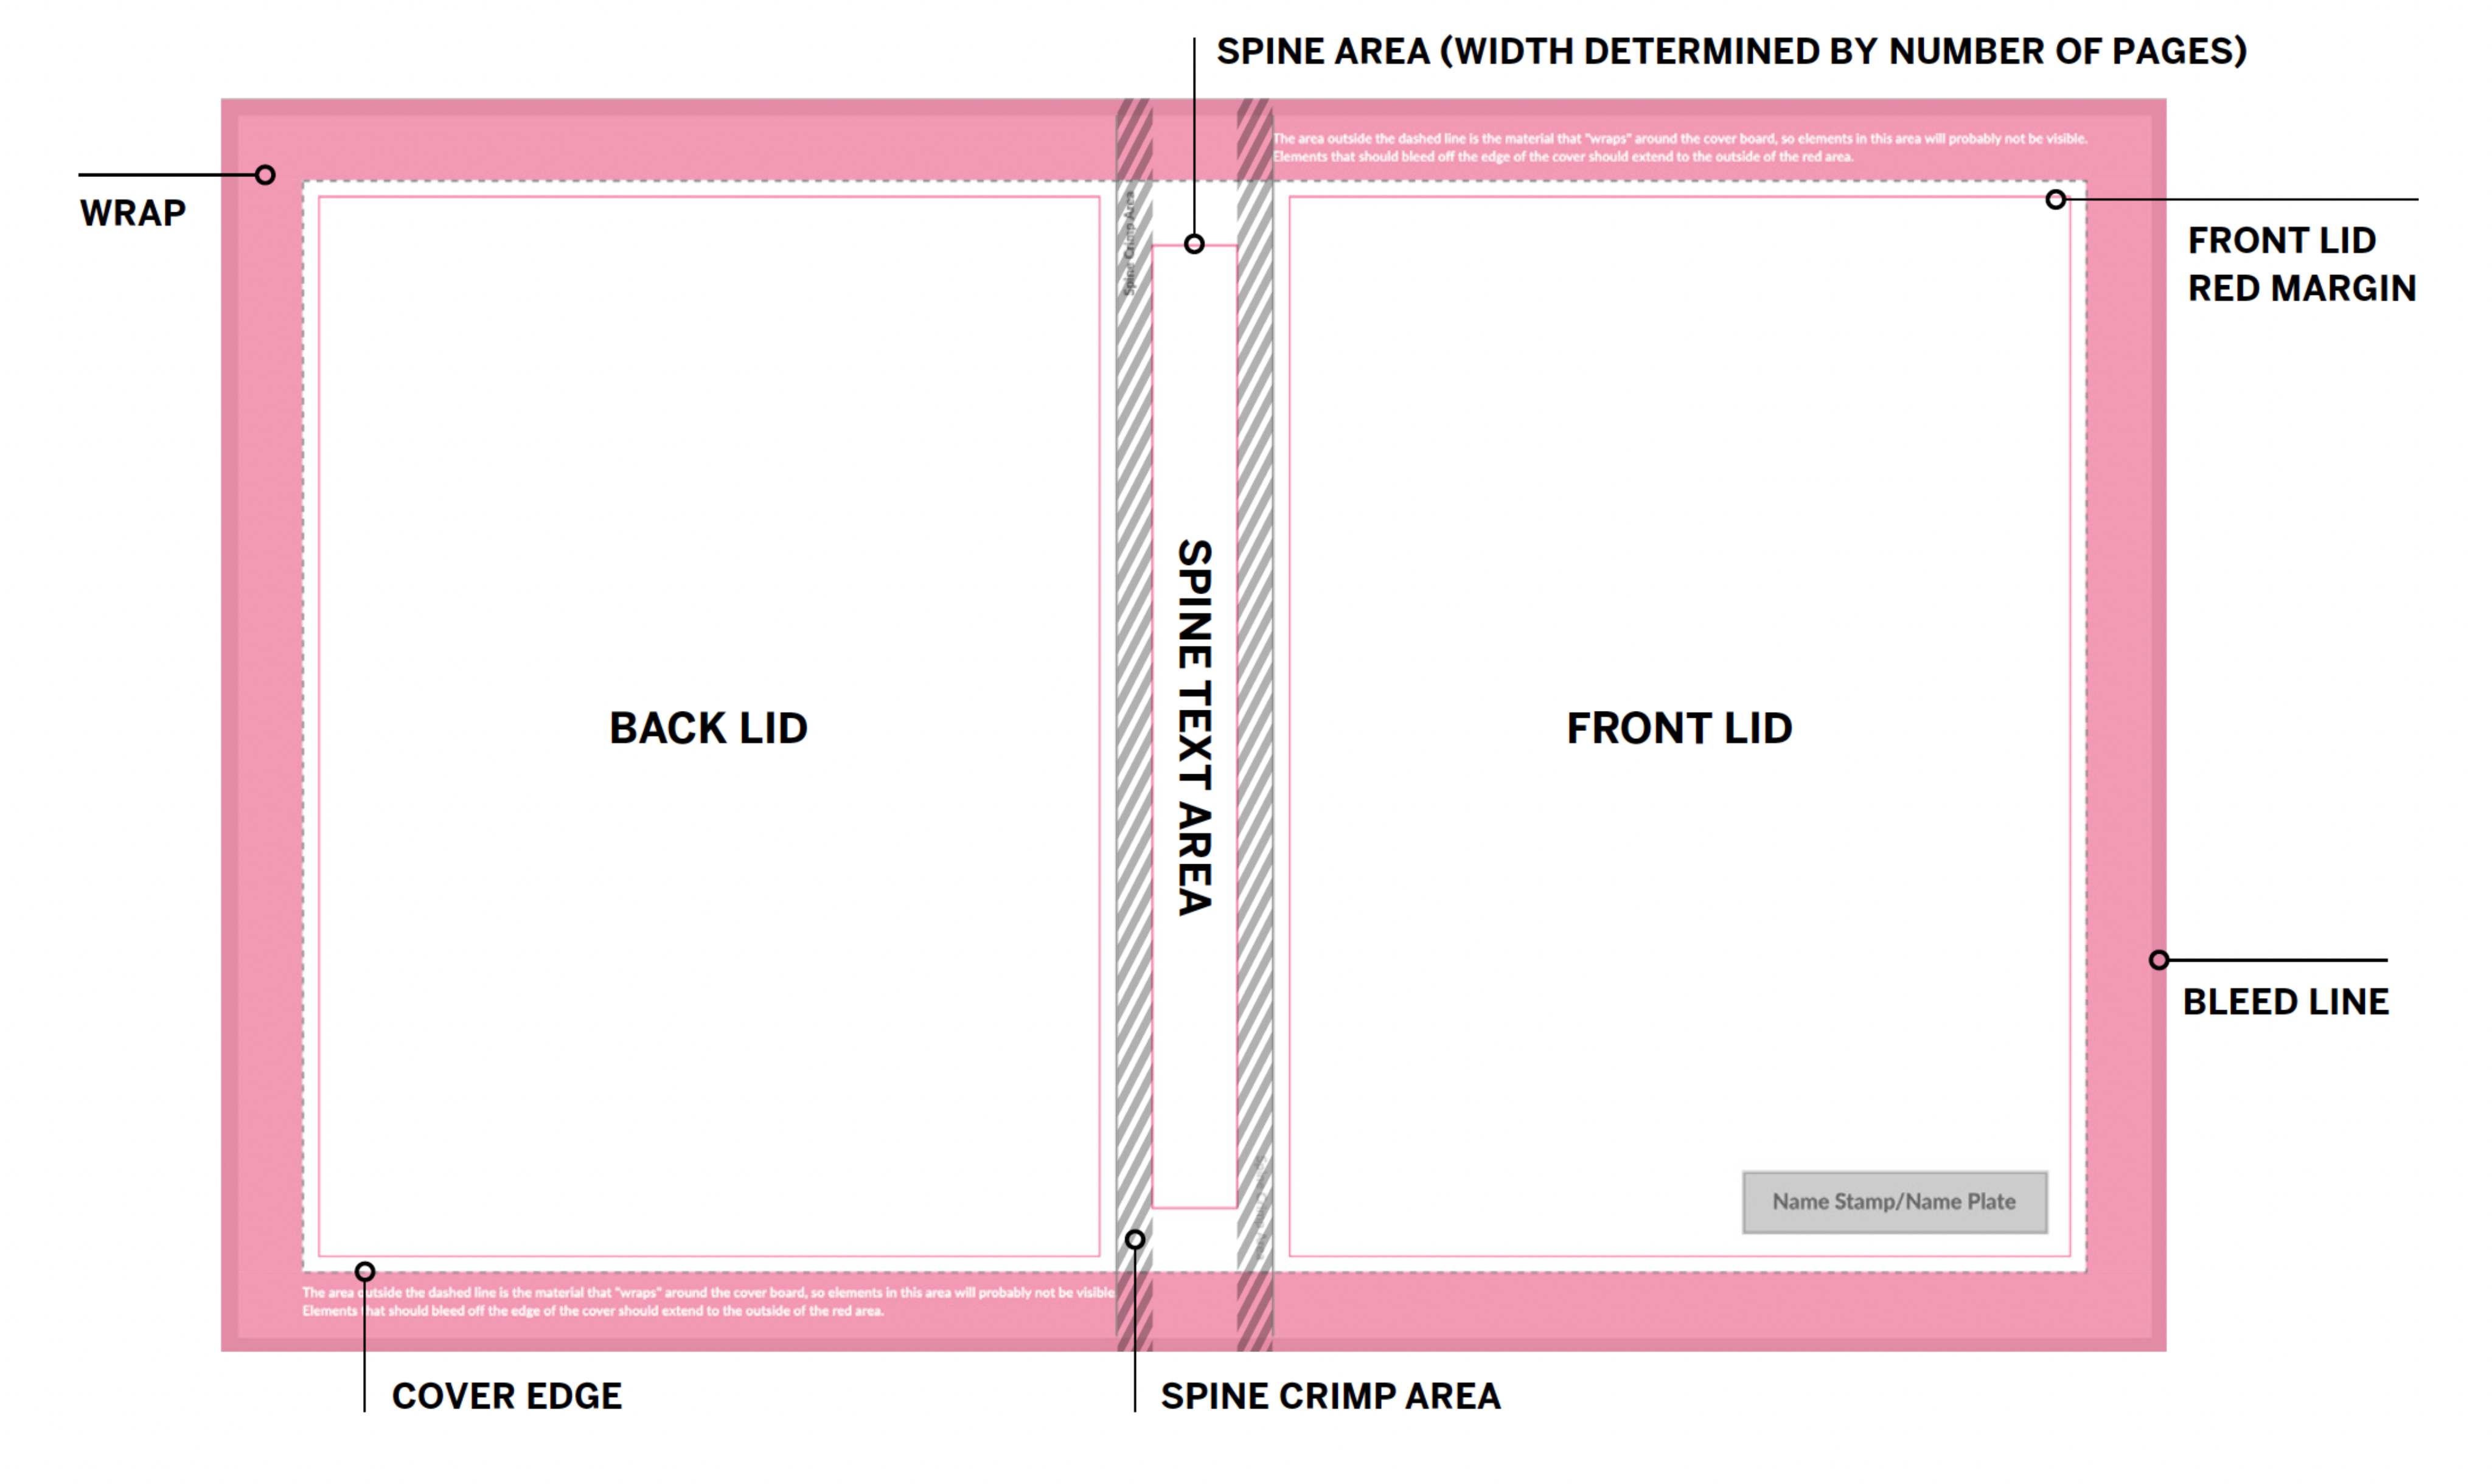
The cover is the first impression of your yearbook and should reflect the theme and uniqueness of your school year. Before you jump into inspiration and designing, it’s important to make sure you understand cover terminology. Let’s get started with four terms:
Bleed:When an element extends past the grid and to the outside edge of the page. This can be used for color, graphics and dominant photos, but never copy.
Spine:Area of the yearbook connecting the front and back lids. The name of the school, name of the book, city/state, volume number and year should appear on the spine in a way that reflects the theme.
Crimp: Open a yearbook and lay it facedown. On either side of the spine, there’s an area called the crimp. Copy shouldn’t cross over the crimp because of distortion during the production process and repeated opening and closing of the cover.
Wrap:Area of the yearbook folding around the binders board that will be covered by the endsheet. If design elements are intended to go into the wrap area, they should extend to the farthest edge, similar to a bleed.
Find resources, ideas and more at ybk.link/cover-prep.
Not a Varsity Yearbook customer?
Fill out this quick form, and we’ll put you in touch with a local representative to learn more.
It’s National School Picture Day! Portrait pages are a key element of any yearbook, but we know they can also be one of the most challenging sections to create. Here are some tips to streamline the process and complete portrait pages efficiently:
Plan Ahead: Successful portrait pages start with early planning. Work closely with your photographer to schedule picture days, retakes and make-up sessions well in advance.
Choose a Consistent Layout: Use eDesign’s Portrait Flow to add placeholders to plan first, then update your flows once you have the files uploaded. This helps you plan the design while you wait for the files!
Double-Check for Accuracy: Ensure all names, grades and titles are correct. Have multiple people review the pages to catch any errors or omissions. Consider creating a proofing process where students can verify their photos and information before finalizing the pages.
Incorporate More Coverage: While the traditional headshot is important, consider adding content to your spreads for better coverage. This adds variety and makes the pages more engaging.
Stay Flexible: Last-minute changes are inevitable. Stay adaptable and be ready to make adjustments as needed.
Not a Varsity Yearbook customer?
Fill out this quick form, and we’ll put you in touch with a local representative to learn more.
https://yearbookdiscoveries.com/wp-content/uploads/2024/09/Portraits-Leilehua-HS_Wahiawa-HI.jpg9601440VARSITY YEARBOOKhttps://yearbookdiscoveries.com/wp-content/uploads/2024/03/Varsity_Yearbook_V-braid-1-1.pngVARSITY YEARBOOK2024-09-12 10:00:042024-09-11 16:38:06It's National School Picture Day!
To make teaching yearbook easier, we developed the Welcome to YBK education videos. These bite-sized videos supplement our core curriculum. Access the full gallery at ybk.link/edu-videosor visit sections under the Education menu on Yearbook Discoveries.
Theme: Establish the theme early to set the tone. Present the Theme 101 slideshow at ybk.link/themeand watch the videos on Yearbook Discoveries. (Workbook: Go to pages 14-19.)
Captions: Captions add context and make photos come to life. Check out ybk.link/reportingand download the Captions slideshow. (Workbook: Go to pages 76-77.)
Photo Composition: Great photos are essential. Visit ybk.link/photographyand download the What Makes a Good Photo and Photo Composition slideshows. Watch the related videos on Yearbook Discoveries. (Workbook: Go to page 96.)
Not a Varsity Yearbook customer?
Fill outthis quick form, and we’ll put you in touch with a local representative to learn more.
https://yearbookdiscoveries.com/wp-content/uploads/2024/08/01_INTRO.png19233456VARSITY YEARBOOKhttps://yearbookdiscoveries.com/wp-content/uploads/2024/03/Varsity_Yearbook_V-braid-1-1.pngVARSITY YEARBOOK2024-08-20 11:32:442024-08-20 12:05:45Teach These First
https://yearbookdiscoveries.com/wp-content/uploads/2024/08/Welcome_to_YBK-cover_PROPOSAL.jpg19972108VARSITY YEARBOOKhttps://yearbookdiscoveries.com/wp-content/uploads/2024/03/Varsity_Yearbook_V-braid-1-1.pngVARSITY YEARBOOK2024-08-08 12:00:202024-08-07 16:31:20It's time for back to school!